爬虫学习 urllib python内置的http请求库
4大模块:
1.request模块:最基本的http请求模块
2.error模块:异常处理模块
3.parse模块:工具模块,提供url的处理方法
4.robotparser模块:识别robot.txt
request 第一个爬虫 1 2 3 4 5 6 7 8 9 10 11 12 13 14 15 16 17 18 import urllib.requestdef load_baidu_data ():'http://www.baidu.com/' 'utf-8' )with open ('baidu.html' ,"w" ,encoding="utf-8" ) as f:
get请求 1 2 3 4 5 6 7 8 9 10 11 12 13 14 15 16 17 18 19 20 21 22 23 24 25 26 27 28 29 30 31 32 33 34 35 36 37 38 39 40 41 42 43 44 45 46 47 import urllib.requestimport urllib.parseimport stringdef load_baidu_data ():'https://www.baidu.com/s?wd=' "卢本伟" print (encode_url)print (response.code)import urllib.requestimport urllib.parseimport stringdef load_baidu_data ():'https://www.baidu.com/s?' "wd" :"孙悟空" ,"pn" :"80" print (query_str)print (final_url)'utf-8' )print (str_data) with open ('baidu-wukong-pn80.html' ,"w" ,encoding="utf-8" ) as f:
post请求 1 2 3 4 5 6 7 8 9 10 11 12 13 14 15 16 17 18 19 20 21 22 23 import urllib.requestimport urllib.parseimport string'http://httpbin.org/post' 'hello' :'world' ,'handsome' :'r1cky' 'utf-8' )print (response.read().decode("utf-8" ))
超时控制:timeout 1 2 3 4 5 6 7 8 9 0.1 )try :0.1 )print (response.read().decode("utf-8" ))except urllib.error.URLError as e:print ("连接超时" )
自定义user-agent 爬虫的核心就是模拟用户 !!!
1 2 3 4 5 6 7 8 9 10 11 12 13 14 15 16 17 18 19 20 import urllib.requestimport urllib.errorimport urllib.parseimport string'http://httpbin.org/post' "User-Agent" :"Mozilla/5.0 (Windows NT 10.0; Win64; x64) AppleWebKit/537.36 (KHTML, like Gecko) Chrome/116.0.0.0 Safari/537.36" ,"hello" :"world" 'POST' )print (response.read().decode('utf-8' ))
随机UA头小项目 每次请求,都切换不同的user-agent
UA头数据网站:UserAgent大全_常用的UserAgent库下载_UserAgent在线工具_流行的UserAgent手机库UA_UA标识网 (kuzhazha.com)
思路:
1.定义多个ua头 列表
2.每次请求时切换ua头
1 2 3 4 5 6 7 8 9 10 11 12 13 14 15 16 17 18 19 20 21 22 23 24 25 26 27 28 import urllib.requestimport urllib.errorimport urllib.parseimport randomdef user_agent ():'http://httpbin.org/post' "Mozilla/5.0 (Linux; Android 12; ELS-AN00 Build/HUAWEIELS-AN00; wv) AppleWebKit/537.36 (KHTML, like Gecko) Version/4.0 Chrome/107.0.5304.141 Mobile Safari/537.36 XWEB/5075 MMWEBSDK/20230504 MMWEBID/9308 MicroMessenger/8.0.37.2380(0x2800253D) WeChat/arm64 Weixin NetType/5G Language/zh_CN ABI/arm64 MiniProgramEnv/android" ,"Mozilla/5.0 (iPhone; CPU iPhone OS............ile/15E148 MicroMessenger/8.0.34(0x18002234) NetType/4G Language/zh_CN" ,"Mozilla/5.0 (Windows; U; Windows NT 5.1; hu; rv:1.8.0.11) Gecko/20070312 Firefox/1.5.0.11" ,"Mozilla/5.0 (Macintosh; Int............ecko) Chrome/114.0.0.0 Safari/537.36 Edg/114.0.1823.67" ,"Mozilla/5.0 (X1............7.6) Gecko/20050318 Firefox/1.0.2" ,"Mozilla/5.0 (Windows; U; Win............o) Chrome/100.0.4896.58 Safari/537.36 UCBrowser/15.4.8.1238" ,'POST' )"User-Agent" ,random_user_agent)print (response.read().decode("utf-8" ))
自定义opener handler:
1 2 3 4 5 6 7 8 9 10 11 12 13 14 15 16 17 import urllib.requestimport urllib.errorimport urllib.parseimport randomdef handler_open ():'http://httpbin.org/get' open (url)print (response.read().decode("utf-8" ))
配置代理 代理的类型:
免费代理 大都不靠谱
1 2 3 4 5 6 7 8 9 10 11 12 13 14 15 16 17 18 19 20 21 22 23 24 25 26 import urllib.requestimport urllib.errorimport urllib.parseimport randomdef handler_open ():try :'http://httpbin.org/post' "http" :"http://ip:port" open (url)print (response.read().decode("utf-8" ))except urllib.error.URLError as e:print ("error: " ,e)
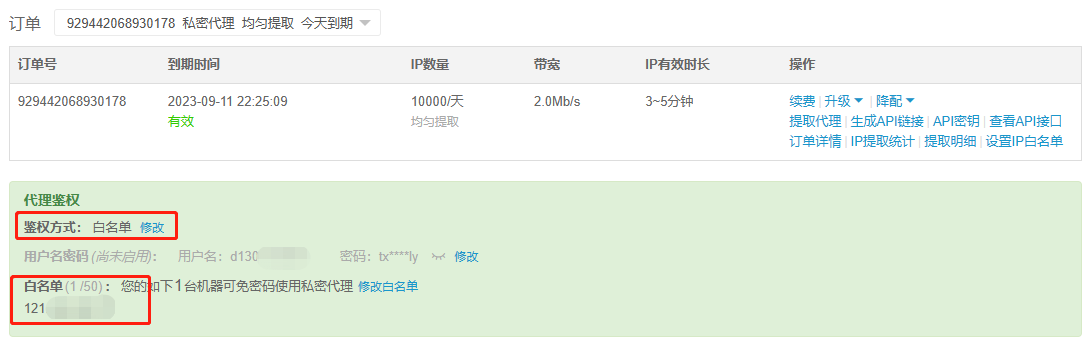
随机代理小项目 代理购买:快代理 - 企业级HTTP代理IP云服务 (kuaidaili.com)
配置代理池:
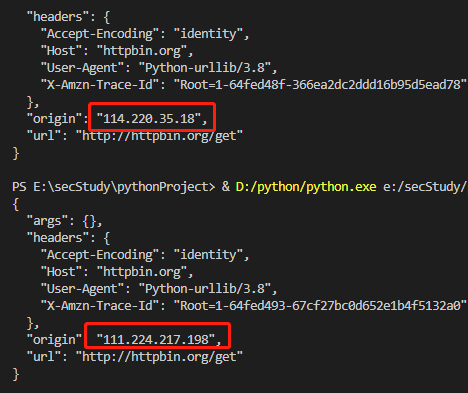
1 2 3 4 5 6 7 8 9 10 11 12 13 14 15 16 17 18 19 20 21 22 23 24 25 26 27 28 29 30 31 import urllib.requestimport urllib.errorimport urllib.parseimport randomdef proxy_ip ():'http://httpbin.org/get' "http://111.224.217.xxx:19394" ,"http://114.220.35.xxx:19942" ,"http://117.87.209.xxx:23350" ,"http://121.233.172.xxx:22936" ,"http://182.38.126.xxx:16113" try :'http' :proxy,'https' :proxy})open (url)print (response.read().decode("utf-8" ))except urllib.error.URLError as e:print ("error: " ,e)
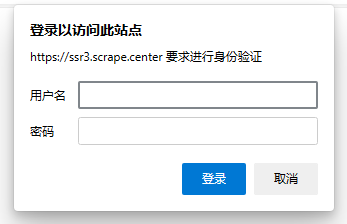
授权认证 身份认证:
HTTPBasicAuthHandler(用户基本的身份验证处理)
需要认证的测试网站:https://ssr3.scrape.center/ (admin admin)
直接访问:
1 2 3 4 None ,url,username,password)
第一个参数为NONE,表示默认的域
1 2 3 4 5 6 7 8 9 10 11 12 13 14 15 16 17 18 19 20 21 22 import urllib.requestfrom urllib.parse import urlparsedef auth_login ():"https://ssr3.scrape.center/" "admin" "admin" None ,url,username,password)open (url)print (response.code)print (response.read().decode('utf-8' ))
cookie认证 1 2 3 4 5 6 7 8 9 10 11 12 13 14 15 16 17 import urllib.requestfrom urllib.parse import urlparsedef auth_login ():"https://ssr3.scrape.center/" "User-Agent" :"Mozilla/5.0 (Windows NT 10.0; Win64; x64) AppleWebKit/537.36 (KHTML, like Gecko) Chrome/116.0.0.0 Safari/537.36" ,"Authorization" :"Basic YWRtaW46YWRtaW4=" print (response.read().decode('utf-8' ))
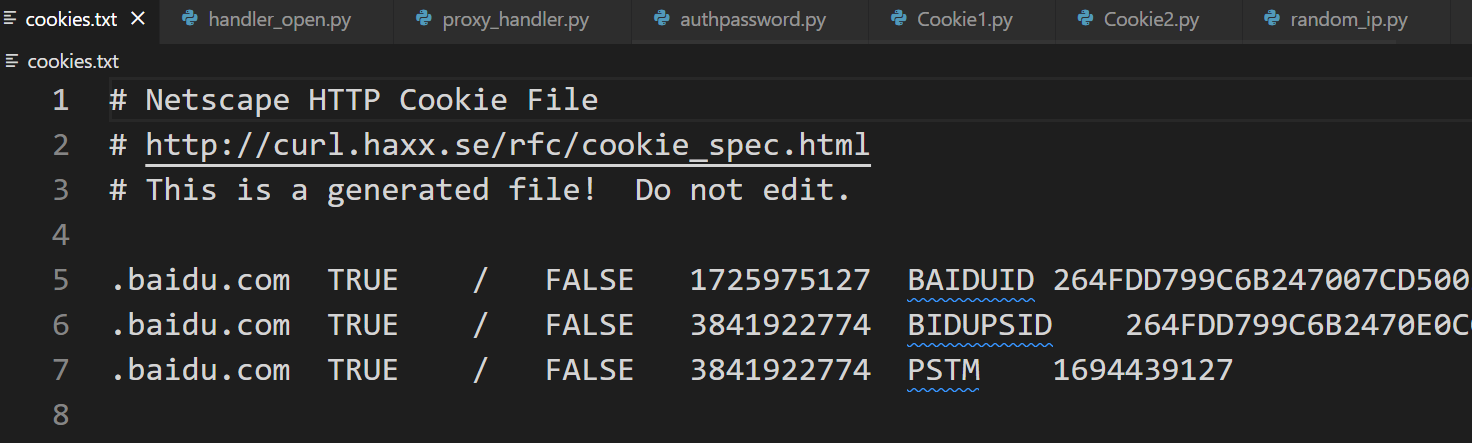
cookiejar 读写文件 写:
MozillaCookieJar 将cookie写进文件
1 2 3 4 5 6 7 8 9 10 11 12 13 14 15 16 17 18 19 20 21 22 import urllib.requestimport http.cookiejar'cookies.txt' open ("http://www.baidu.com" )True ,ignore_expires=True )
LWP格式:
读:
1 2 3 4 5 6 7 8 9 10 11 12 13 14 15 16 17 18 import urllib.requestimport http.cookiejar'cookies.txt' True ,ignore_expires=True )open ('http://www.baidu.com' )print (response.read().decode('utf-8' ))
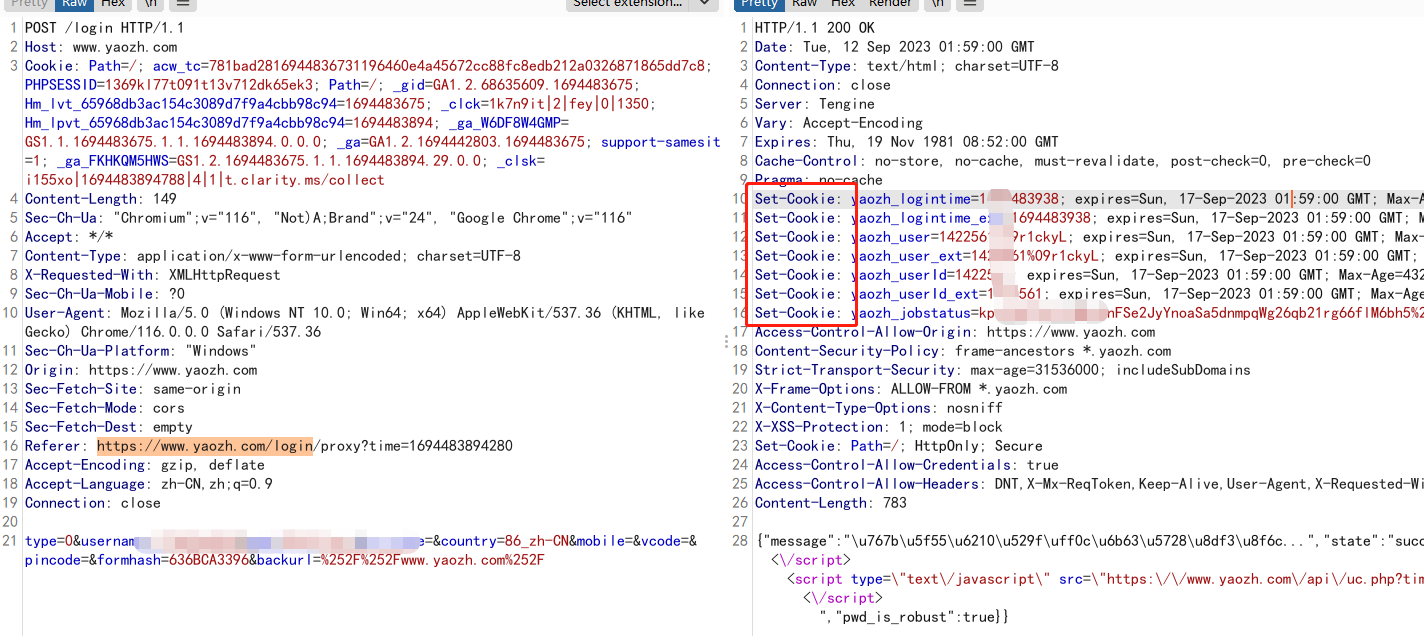
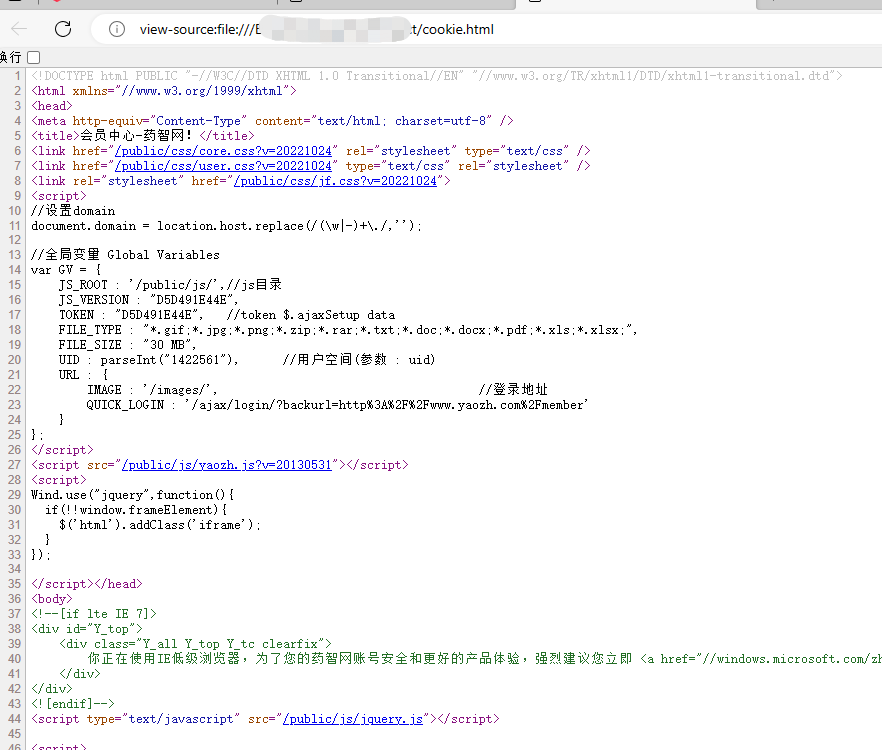
小项目 – 使用cookie登录网站 测试网站:https://www.yaozh.com/login
1 2 3 4 5 6 7 8 9 10 11 12 13 14 15 16 17 18 19 20 21 22 23 24 25 26 27 28 29 30 31 32 33 34 35 36 37 38 39 40 41 42 43 44 45 46 47 48 49 import urllib.requestimport http.cookiejarimport urllib.parse'https://www.yaozh.com/login' "type" :"0" ,"username" :"xxx" ,"pwd" :"xxx" ,"pc_vcode" :"86_zh-CN" ,"country" :"" ,"mobile" :"" ,"vcode" :"" ,"pincode" :"" ,"formhash" :"636BCA3396" ,"backurl" :"%252F%252Fwww.yaozh.com%252F" , "User-Agent" :"Mozilla/5.0 (Windows NT 10.0; Win64; x64) AppleWebKit/537.36 (KHTML, like Gecko) Chrome/116.0.0.0 Safari/537.36" ,'utf-8' )open (req)"https://www.yaozh.com/member" open (login_url)with open ('cookie.html' ,"wb" ) as f:
异常处理 防止程序健壮性较差
urllib的error模块:
urlerror:继承OSError
1 2 3 4 5 6 7 8 9 10 11 12 13 14 15 16 17 18 19 20 21 22 23 try :except error.URLError as e:print (e.reason) import urllibfrom urllib import request,errortry :"https://ssr3.scrape.center/asdasd" "User-Agent" :"Mozilla/5.0 (Windows NT 10.0; Win64; x64) AppleWebKit/537.36 (KHTML, like Gecko) Chrome/116.0.0.0 Safari/537.36" ,print (response.read().decode('utf-8' ))except error.URLError as e:print (e.reason)
HTTPError
用于处理HTTP请求
1 2 3 4 5 6 7 8 9 10 11 12 13 14 15 16 17 import urllibfrom urllib.error import *from urllib import requesttry :"https://ssr3.scrape.center/asdasd" "User-Agent" :"Mozilla/5.0 (Windows NT 10.0; Win64; x64) AppleWebKit/537.36 (KHTML, like Gecko) Chrome/116.0.0.0 Safari/537.36" ,print (response.read().decode('utf-8' ))except HTTPError as e:print ("http error: " ,e)
超时异常 — URLError处理
1 2 3 4 5 6 7 8 9 10 11 12 13 14 15 16 17 18 19 20 21 22 23 24 25 import urllibfrom urllib.error import *import urllib.requestimport sockettry :"https://www.baidu.com" 0.01 )except URLError as e:print (e.reason)if isinstance (e.reason,socket.timeout):print ("Time out!!" )
链接的组成和解析 urlparse:python标准库中的一个模块,解析和操作url
scheme://netloc/path;params?query#fragment
scheme(协议) http or https
1 2 3 4 5 6 7 8 9 10 11 12 from urllib.parse import urlparse'http://www.baidu.com/index.html;user?id=0#comment' print (type (result),result)class 'urllib.parse.ParseResult' > 'http' , netloc='www.baidu.com' , path='/index.html' , params='user' , query='id=0' , fragment='comment' )
urlunparse:与urlparse相反,组合url
1 2 3 4 5 6 7 from urllib.parse import urlparse, urlunparse'http' ,'www.baidu.com' ,'index.html' ,'user' ,'id=0' ,'comment' ]print (url)id =0
urlsplit:与urlparse类似,用于将url参数分割成不同的部分,但不会解析查询参数和片段部分
返回的是一个元组 可以用索引取值
1 2 3 4 5 6 7 8 9 10 11 12 13 14 15 16 17 18 19 20 21 22 23 24 25 26 from urllib.parse import urlparse, urlunparse,urlsplit'http://www.baidu.com/index.html;user?id=0#comment' print (parts)print (parts.scheme)print (parts[0 ])print (parts.netloc)print (parts.path)print (parts.query)print (parts.fragment)'http' , netloc='www.baidu.com' , path='/index.html;user' , query='id=0' , fragment='comment' )id =0 'http' ,'www.baidu.com' ,'index.html' ,'id=0' ,'comment' )print (urlunsplit(data))id =0
urljoin:urljoin()是连接一个基本URL和一个可能的相对URL来形成一个绝对URL
参数:
base 基本url,通常是一个绝对的url
url 这个是相对的url
1 2 3 4 5 6 7 8 9 from urllib.parse import urlparse, urlunparse,urlsplit,urlunsplit,urljoin'https://www.baidu.com' 'path/to/xxx' print (url)
注意:base_url 提供了三项内容 scheme、netloc 和 path。如果这 3 项在新的链接里不存在,就予以补充;如果新的链接存在,就使用新的链接的部分。而 base_url 中的 params、query 和 fragment 是不起作用的。
get参数的序列化
将参数转为元组组成列表
1 2 3 4 5 6 7 8 from urllib.parse import urlparse, urlunparse,urlsplit,urlunsplit,urljoin,parse_qs 'name=handsomer1&age=18' print (parse_qs(query))print (parse_qsl(query))'name' : ['handsomer1' ], 'age' : ['18' ]}'name' , 'handsomer1' ), ('age' , '18' )]
url编码
url解码
1 2 3 4 5 6 7 8 9 10 from urllib.parse import quote, unquote"卢本伟" 'https://www.baidu.com/s?wd=' +quote(keyword)print (url)print (url_1)
用于解析robots.txt
1 2 3 4 5 6 7 8 9 10 11 12 13 14 15 16 17 18 19 20 21 from urllib.robotparser import RobotFileParser'https://www.zhihu.com/robots.txt' )"BaiduSpider" 'https://www.zhihu.com' if robot_parser.can_fetch(user_agent,check_url):print ("可以爬取此url" )else :print ("不能爬取此url" )
requests库 普通请求 get post put … 1 2 3 4 5 6 7 8 9 10 11 12 13 14 15 16 17 18 19 20 21 22 23 24 25 26 27 28 29 30 31 32 33 34 import requests'Usrt-Agent' :'Mozilla/5.0 (Windows NT 10.0; Win64; x64) AppleWebKit/537.36 (KHTML, like Gecko) Chrome/116.0.0.0 Safari/537.36' 'https://www.zhihu.com' ,headers=headers)print (r.text)
高级用法(文件上传 requestcookiejar session等) 文件上传 1 2 3 4 5 6 7 import requests'http://httpbin.org/post' 'file' :open ('favicon.ico' ,'rb' )}print (r.text)
获取cookie 1 2 3 4 5 6 7 8 9 10 11 12 13 14 15 16 17 18 19 20 21 22 import requests'http://www.zhihu.com' 'Cookie' :xxx', ' User-Agent':' Mozilla/5.0 (Windows NT 10.0 ; Win64; x64) AppleWebKit/537.36 (KHTML, like Gecko) Chrome/116.0 .0 .0 Safari/537.36 ' } r = requests.get(url=url,headers=headers) with open(' 1. html',' wb') as f: f.write(r.text.encode(' utf-8 ')) print(r.cookies) for k,v in r.cookies.items(): print(k + "=" + v)
使用cookiejar保存cookie,并携带cookie访问网页 1 2 3 4 5 6 7 8 9 10 11 12 13 14 15 16 17 18 19 20 21 import requests.cookies'xxx' 'User-Agent' :'Mozilla/5.0 (Windows NT 10.0; Win64; x64) AppleWebKit/537.36 (KHTML, like Gecko) Chrome/116.0.0.0 Safari/537.36' for cookie in Cookie.split(';' ):'=' ,1 )set (key,value)'https://www.zhihu.com' ,cookies=jar,headers=headers)with open ('2.html' ,'wb' ) as f:'utf-8' ))
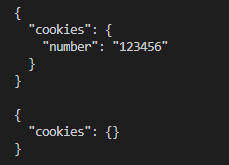
session 1 2 3 4 5 6 7 8 import requests'http://httpbin.org/cookies/set/number/123456' )print (r1.text)'http://httpbin.org/cookies' )print (r2.text)
存在的问题:每次请求独立 第一次设置了cookie之后第二次请求不存在了
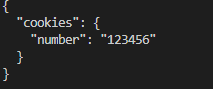
使用session:
1 2 3 4 5 6 7 8 9 'http://httpbin.org/cookies/set/number/123456' )'http://httpbin.org/cookies' )print (r.text)
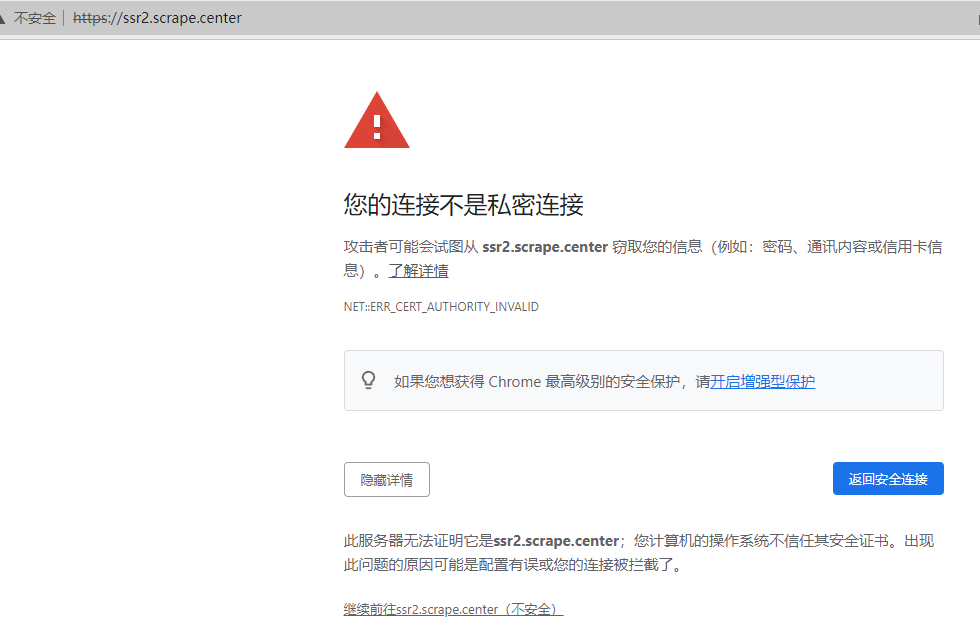
ssl证书校验 测试网址:https://ssr2.scrape.center/
缺少证书,需要自己点继续前往的情况
直接请求 报错:
添加verify=False即可绕过
1 2 r = requests.get('https://ssr2.scrape.center/' ,verify=False )print (r.status_code)
超时 timeout参数
1 2 r = requests.get('https://ssr2.scrape.center/' ,verify=False ,timeout=0.1 )print (r.status_code)
身份认证(httpbasicAuth) 1 2 3 4 from requests.auth import HTTPBasicAuth'https://ssr3.scrape.center/' ,verify=False ,auth=HTTPBasicAuth('admin' ,'admin' ))print (r.text)
代理设置 1 2 3 4 5 6 7 8 9 10 11 12 13 14 15 16 from weakref import proxyimport requests'http' :'http://代理地址:端口' ,'http' :'http://代理地址:端口' 'https://www.baidu.com' ,proxies=proxy_list)'http' :'sock5:username:password@host:port' 'https://www.baidu.com' ,proxies=proxies)
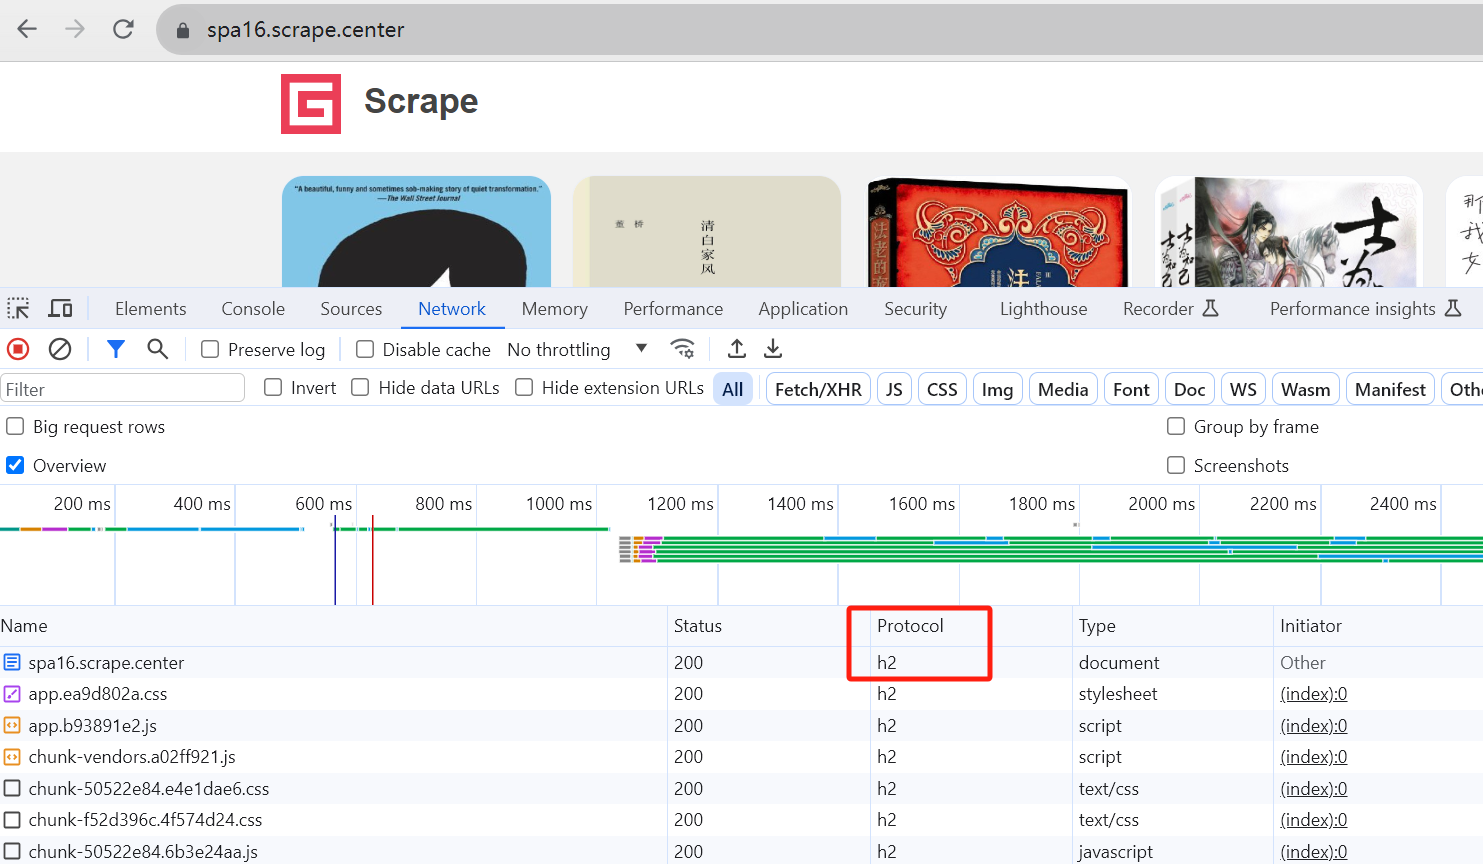
httpx httpx库 爬取使用http2.0的网站
https://spa16.scrape.center/
支持http2.0还需要安装2.0的支持:
pip install “httpx[http2]”
代码中配置:
client = httpx.Client(http2=True)
1 2 3 4 5 6 7 8 9 10 11 12 13 14 15 16 17 18 import requestsimport httpx'https://spa16.scrape.center/' "User-Agent" :"Mozilla/5.0 (Windows NT 10.0; Win64; x64) AppleWebKit/537.36 (KHTML, like Gecko) Chrome/117.0.0.0 Safari/537.36" "name" :"handsome r1" True )'https://www.httpbin.org/post' ,headers=headers,data=data)print (response.text)